Introduction to HTML and CSS
Topics
- HTML
- Elements
- Tags
- Attributes
- Basic CSS
- Selectors
- Properties
- Styling
- Sizing & Positioning
- Page Layouts
What is HTML, CSS and Javascript?
HTML provides the basic structure of sites.
CSS is used to control presentation, formatting, and layout.
JavaScript is used to control the behavior of different elements.
HTML decides what is on the page, CSS decides what the page looks like, and Javascript decides what the page can do.
HTML, CSS, and Javascript are ever evolving technologies that were created around the year 2000, practically ancient in web development terms. They all have their own systems for adding new features and aren't always consistent with each other or even within themselves. Because of this, there are often dozens of ways to do the same thing with HTML, CSS and Javascript. This can be confusing to beginners or even experienced developers, but it's important to not get discouraged and to always keep an open mind to alternative approaches even if you don't need them.
To learn more, this blog gives a good overview of some of the basics of the three technologies.
Side Note: Javascript is a programming language, HTML and CSS have their own syntax and can do some similar things, but they are not programming languages.
Side Note: Browsers are essentially parsers of HTML, CSS, and Javascript. The reason the development of HTML, CSS, and Javascript are so distributed / hard to follow is because for a new feature to be added, browsers have to update their engines to support the feature. You'll often see compatibility charts for newer features that show which browser versions support the feature and which do not (this is why you hear web developers curse internet explorer so much).
HTML
HTML is a subset of XML. We'll first describe XML in general and then talk about the rules that make HTML different.
What is XML?
XML defines a syntax (a set of rules) to express data. There are 3 main aspects of XML.
A tag is the basic structure that defines XML.
Opening Tag Example: <element>
Closing Tag Example: </element>
Every tag has a name which is the first word following immediately after the opening bracket (<). Every tag also has to have a closing tag somewhere after it.
An element is an opening tag, a closing tag, and everything included between the two. A closing tag is simply </element> where element is just the name of the tag repeated again.
Between the opening and closing tags are the second aspect of XML, children. Between an element's two tags is a list of either other XML elements or plain text. Every item in this list is a child of the element that is surrounding them. Of course, an XML element that is the child of an element can also have its own children. You'll often hear the term "depth" of an XML element to refer to the number of parents that that element has.
<parent>
    <first-child>
        Richard
        <first-grandchild>
            Jamie
        </first-grandchild>
        <second-grandchild>
            Jessica
        </second-grandchild>
    </first-child>
    <second-child>
        John
    </second-child>
    <third-child>
        Dylan
        <third-grandchild>
          Alice
        </third-grandchild>
    </third-child>
</parent>
Side note: Often it'll be the case that an XML element has zero children. You can still write out both the opening and closing tags with nothing between them, but XML also has a shorthand that saves some time retyping the closing tag:
<element></element>===<element />
The third aspect of XML is attributes. Attributes live within the opening tag of XML elements. Attributes have a name and a value, both of which are just plain strings (words). The attribute value will always be wrapped in double quotes or single quotes.
<element attributeName="attributeValue" />
Attributes allow you to specify extra information about an element.
An XML element can have as many attributes as you want.
How is HTML different than XML?
Like we said earlier, HTML is a subset of XML. All HTML is also XML, but not all XML is HTML.
HTML defines several XML elements and gives guidelines on how they can be used together. There are a ton of different HTML elements that are defined and a lot of them aren't super useful so don't bother trying to learn all of them right now (google is your friend though).
You can also find a full list of HTML element types on Mozilla's MDN site.
A couple of the important HTML elements to know are:
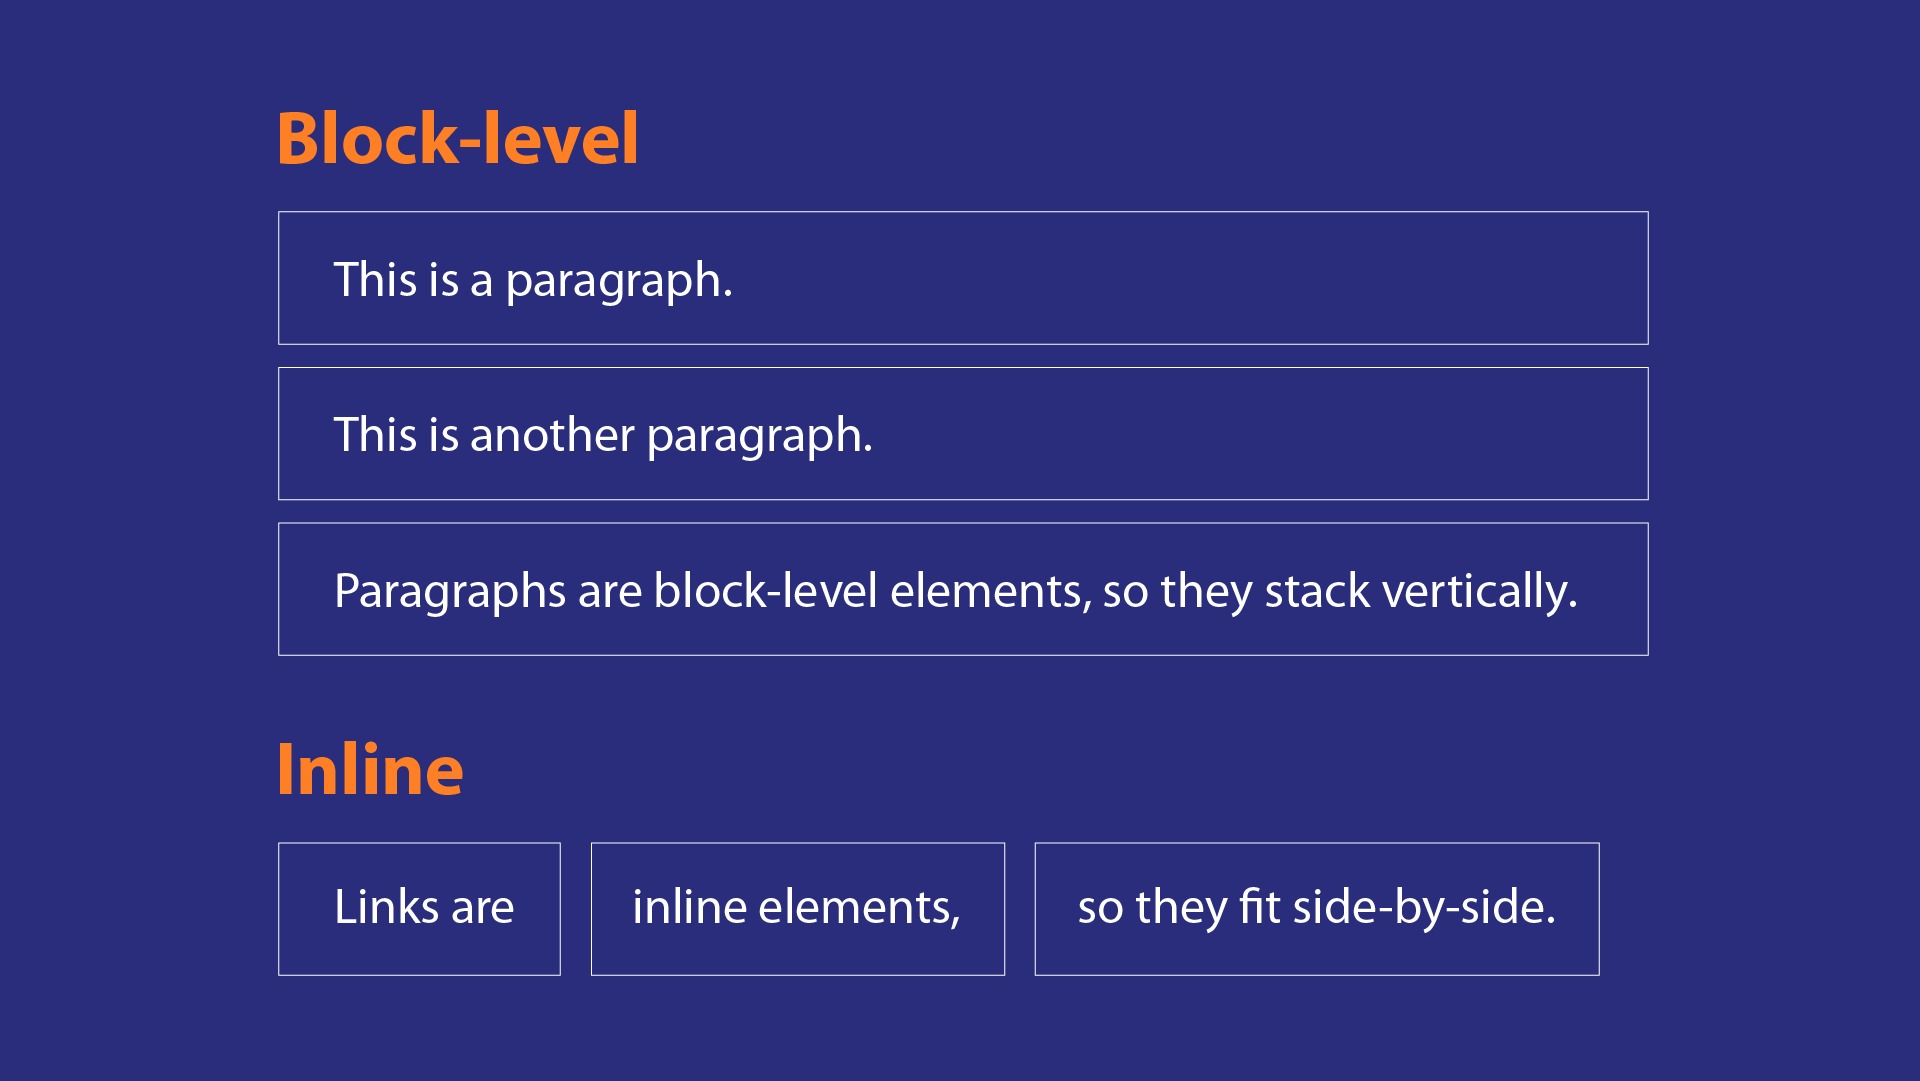
<div>: Defines a block element<span>: Defines an inline element<p>: Stands for paragraph, use this to wrap text<a>: Defines a hyperlink to a new web page- This tag requires you define an
hrefattribute to specify the page this links to
- This tag requires you define an
<input>: Defines an area a user can enter data- This tag requires you define a
typeattribute to specify the type of input you're expecting. See all types of inputs here
- This tag requires you define a
Side Note: An inline element sits within the text of a page without any line breaks. A block element takes up a block of space on the page and will cause a line break.
For each defined element, HTML also defines a ton of different attributes that you can optionally add to an element. Some of these attributes are required for certain tags. We'll see more of these in practice, and two important ones when we talk about CSS.
In addition, for a file to be considered an HTML file, there are a couple of standard patterns you need to follow. But, because we're using React for everything, React takes care of all of that for us, so we won't cover it here. See here for details.
CSS
CCS is the standard for adding styling to your web page. HTML can exist without CSS but CSS cannot do anything without HTML.
A CSS file is just a list of rules. A rule has two parts. It first defines some criteria for specifying which HTML elements it applies to. The rule then also has a list of properties those elements should follow.
CSS, like HTML, defines 100s of different properties for elements, some of which you will use a lot, and some of which you will be fine never using.
Selectors
CSS provides about a dozen ways of defining the elements you want a rule to apply to. We'll cover 3 of the most standard. You can generally get by with these for most use cases, but if a situation requires more complex selection logic, you should be aware that other methods exist and you can google them.
For a full list of CSS selectors, see here.
The first type of selector is an element tag. You simply write the name of an HTML element and all elements of that type will be selected.
The next two types of selectors are looking for HTML elements with particular attribute values. Every HTML element can optionally define an attribute called class and an attribute called id. We can then select an element with a particular class value by preceding the value with a . and we can select an element with a particular id value by preceding the id value with a #.
The only difference between the two is that an element's id value should be unique, no other element on the page should have the same id value, while many elements can have the same class value. Generally, you should favor using classes rather than ids because it makes your code more reusable.
If an element is selected by CSS more than once and conflicting rules are applied to it then one of the values has to be chosen to override all the others. CSS determines the overriding value by favoring selectors that are more specific: class selectors override element tag selectors and id selectors override class selectors. If two rules are using the same type of selector then the rule defined later in the file will be chosen. There are some caveats to this which you can read here.
/* Element selector */
p {
    font-size: 12px;
    font-weight: bold;
}

/* Class selector */
.blog-post {
    width: 100%;
    height: 50px;
    color: lightblue;
}

/* ID selector */
#app {
    text-align: center;
    height: 400px;
}
Properties
Google is your best friend
CSS properties allow you to do just about anything to HTML elements. The three big concepts you'll be handling with CSS in order of complexity are adding style/color to text or elements, changing the size or position of elements, and defining the layout of your elements.
Styling
Styling an element's color or text is often a trial of finding the right attribute for your use case.
Side Note: The fastest way to get better at CSS is by trying to write HTML and CSS webpages based on a design and using google to find the right techniques for your situation. If you're looking for extra practice, try using an existing website as a design and seeing if you can copy their look with your HTML and CSS.
To make things even more confusing, for each property there can be multiple ways of expressing the same value. The color property lets you specify an element's color, and it takes a color value. A color value can be just the name of the color ('red', 'blue', 'gray'), an RGB value ('rgb(255, 0, 255)', 'rgb(0, 0, 255)', 'rgb(125,125,125)'), a Hex color ('#FF0000', '#0000FF', '666666'), or just about any other way you can define a color.
Some other common styling properties are:
font-size: Defines how big your text appearsfont-weight: Allows you to bold or unbold textfont-style: Allows you to italicize text or add other stylesfont-family: Allows you to define the type of font your text appears as (Time's New Roman, Ariel, ext...)background-color: Allows you to specifiy the color of your element's backgroundborder: Allows you to add and style a border to your element, see more here
Sizing and Positioning
To tackle sizing and positioning of elements, you first have to understand the "box model".
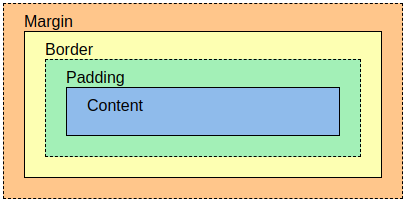
Every HTML element has several boxes around it whose dimensions can be controlled through CSS. Every element has all of these boxes around it, though often these boxes can coincide.
The innermost box is the content box. This is the space that all the children of that element occupy.
Then next box is the padding box. This includes the content box PLUS some padding (empty space) that the element should be surrounded by.
Then is the border box. This includes all the content of the padding box PLUS the border of the element.
Finally, is the margin box. This includes the padding box PLUS the margins around the element.
Margins and padding both define empty space that should surround elements. The main difference is that two adjacent elements can share the same margins, but they can't share the same padding.
For each of these boxes, you can define a width and a height with a corresponding CSS property, these values change the difference between the box and the next most inner box (i.e. border-width: 10px; makes the border box 10 px bigger than the content box on every side).
There is also regular width and height properties. By default, these define the size of the content box, but you can override this behavior so that they refer to the size of the content plus the border by setting box-sizing: border-box; on an element. This is common practice now because it often makes development simpler.
For now, we'll only deal with lengths in units of pixels or px. You can also define lengths with different units including units that are relative to the font size, relative to the size of the browser, and relative to the parent element.
Side Note: pixels don't actually refer to the pixels on your screen, they're a set length that is meant to be consistent across devices and browsers.
Defining Page Layout
Defining layouts can be one of the hardest parts of mastering CSS and figuring out how to position an element just right can frustrate even seasoned developers. This is challenging because a good layout has to be adaptable to many different browser sizes and resolutions that a user may have.
The two prominent CSS systems for creating flexible layouts are called 'flexbox' and 'grid'. Flexbox is great for items that should be grouped together but don't need to have a particular size or strict spacing. Grid is great when there are very clear boundaries for where elements should be. These layouts can be used together as well for more complicated layout patterns. To learn more about these layouts and how to implement themselves you can visit here for flexbox and here for grid.
For now, we will use the CSS we have already designed to fill in a web page layout.